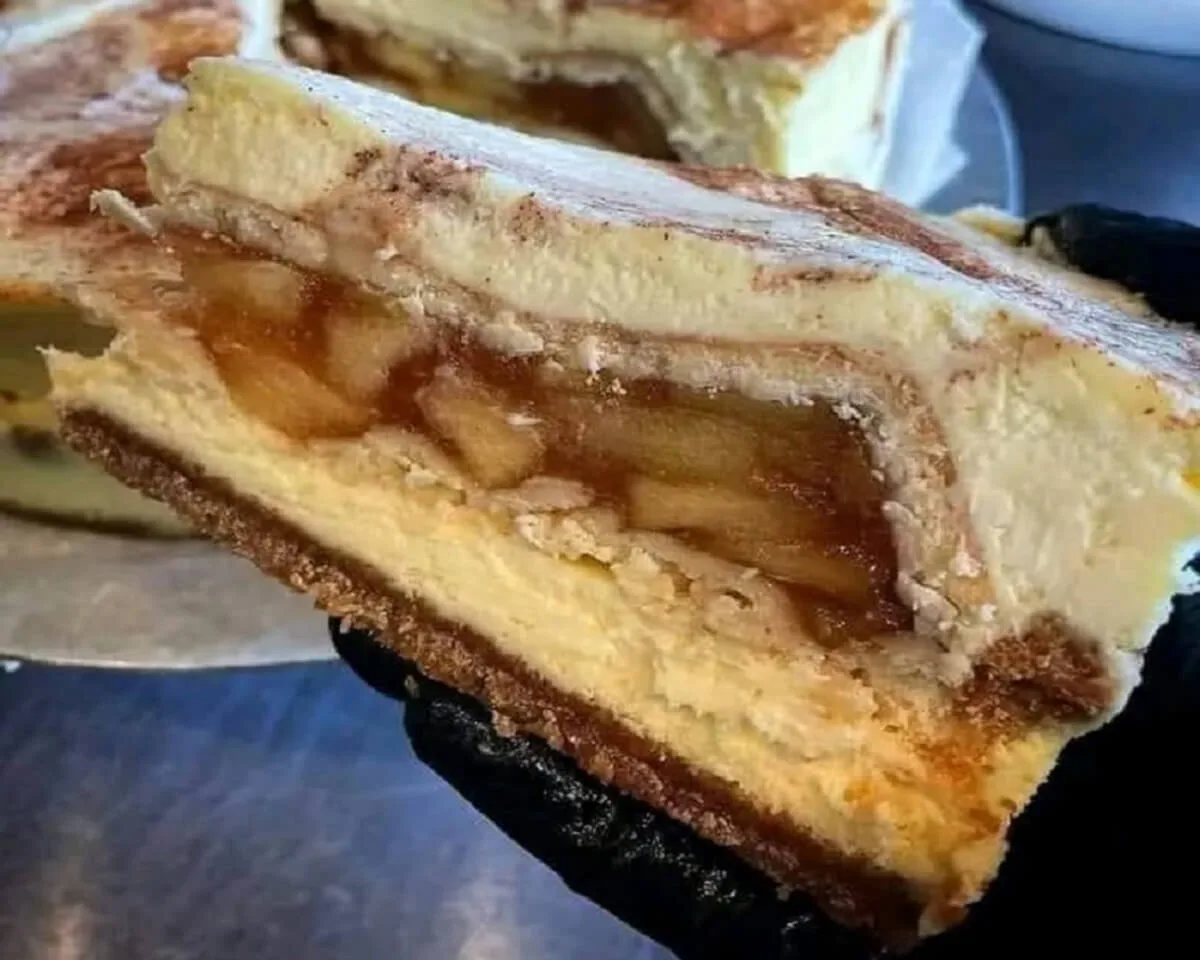
Apple Pie Stuffed Cheesecake is a divine dessert that marries the classic appeal of apple pie with the velvety richness of cheesecake. This indulgent treat features a creamy cheesecake layer enveloping a luscious center of spiced apple pie filling, creating a harmonious fusion of two beloved desserts.
To embark on this delightful culinary journey, gather the essential ingredients. The cheesecake layer is crafted from a blend of cream cheese, sugar, eggs, and vanilla extract, ensuring a smooth and decadent texture. The spiced apple pie filling typically comprises sliced apples, sugar, cinnamon, and occasionally nutmeg or a hint of lemon juice for added depth. The crust, a foundational element, can be fashioned from a mixture of graham cracker crumbs and melted butter.
The preparation begins with forming the graham cracker crust, pressed firmly into the bottom of a springform pan to provide a sturdy and flavorful base for the cheesecake. Meanwhile, the cheesecake filling is expertly blended until achieving a velvety consistency, a delightful precursor to the main event. Once the crust is ready, a layer of the luxuriant cheesecake mixture is poured over it. The pièce de résistance follows, as the spiced apple pie filling is evenly spread atop the cheesecake layer. This strategic layering promises a tantalizing interplay of textures and flavors, with the creamy cheesecake serving as a sumptuous foil to the warmly spiced apple center.
The assembled masterpiece is then gently baked until it achieves a set and firm consistency, allowing the cheesecake to embrace the apple pie filling in a perfect union. After baking, the Apple Pie Stuffed Cheesecake undergoes a period of cooling and refrigeration, typically spanning several hours or overnight. This patient chill period allows the dessert to fully mature, with flavors melding seamlessly and the cheesecake achieving its optimal texture.
Ingredients:
- 1 package Chips Ahoy Thins Cinnamon Sugar Cookies, crumbed
- 4 tablespoons butter, melted
- 2 packages (8 oz) cream cheese, room temperature
- 1/2 cup sugar
- 1/2 cup brown sugar
- 1 teaspoon vanilla
- 1 teaspoon apple pie spice mix
- 1/4 cup sour cream
- 1/4 cup heavy cream
- 3 eggs, room temperature
- 1/2 cup toffee baking chips
- 2 tablespoons butter
- 2 apples, peeled, cored and chopped (Braeburn recommended)
- Splash of lemon juice
- 2 tablespoons brown sugar
- 1/2 teaspoon cinnamon
- 1 teaspoon honey
- 1/4 cup caramel sauce
Directions:
- Grease a 9-inch springform pan. Wrap a sheet of tin foil around the bottom and partially up the sides of the pan on the outside. Preheat the oven to 325 degrees.
- Mix melted butter and cookie crumbs, then press into the bottom of the springform pan. Set aside.
- In a mixing bowl, beat cream cheese, sugar, brown sugar, vanilla, and apple pie spice until smooth. Add sour cream and heavy cream, then mix in the eggs one at a time. Stir in the toffee chips.
- Pour the mixture into the prepared crust and bake for about 60-75 minutes, until the center is just set.
- Remove from the oven and allow to cool. Refrigerate for at least 2 hours.
- In a sauté pan, melt the butter over medium heat. Add the chopped apples and lemon juice. Cook and stir until softened. Mix in the brown sugar and cinnamon. Cook and stir for one more minute, then remove from heat and stir in the honey and caramel sauce. Cool completely to room temperature.
- Gently run a knife around the cheesecake before removing the side of the springform pan.
- Spoon the cooled apple mixture over the cheesecake and serve. Store leftovers, covered, in the refrigerator.
In conclusion, Apple Pie Stuffed Cheesecake is a divine dessert that effortlessly combines the comforting essence of apple pie with the luxuriousness of cheesecake. This fusion of classic flavors and textures is ideal for special occasions or whenever a decadent treat is in order. Now, let’s embark on the step-by-step process of creating this mouthwatering Apple Pie Stuffed Cheesecake in your own kitchen.