Butterscotch Peanut Butter Bars
Butterscotch Peanut Butter Bars are a delightful dessert that combines the rich, buttery flavor of butterscotch with the creamy and nutty taste of peanut butter. These bars are a heavenly treat for those with a sweet tooth and a love for the classic combination of butterscotch and peanut butter. In this blog post, we will explore the art of making Butterscotch Peanut Butter Bars, share variations and serving ideas, and celebrate the joy of indulging in this delectable dessert.
1. The Perfect Blend: Butterscotch and Peanut Butter
Butterscotch and peanut butter are two flavors that harmonize exceptionally well, creating a perfect blend of sweetness and richness. Butterscotch, with its caramelized sugar and buttery undertones, adds a warm and indulgent element to the bars. Peanut butter, on the other hand, brings a creamy and nutty flavor that complements the sweetness of the butterscotch. The combination of these two flavors creates a taste sensation that is hard to resist and leaves you craving for more.
2. The Art of Making Butterscotch Peanut Butter Bars
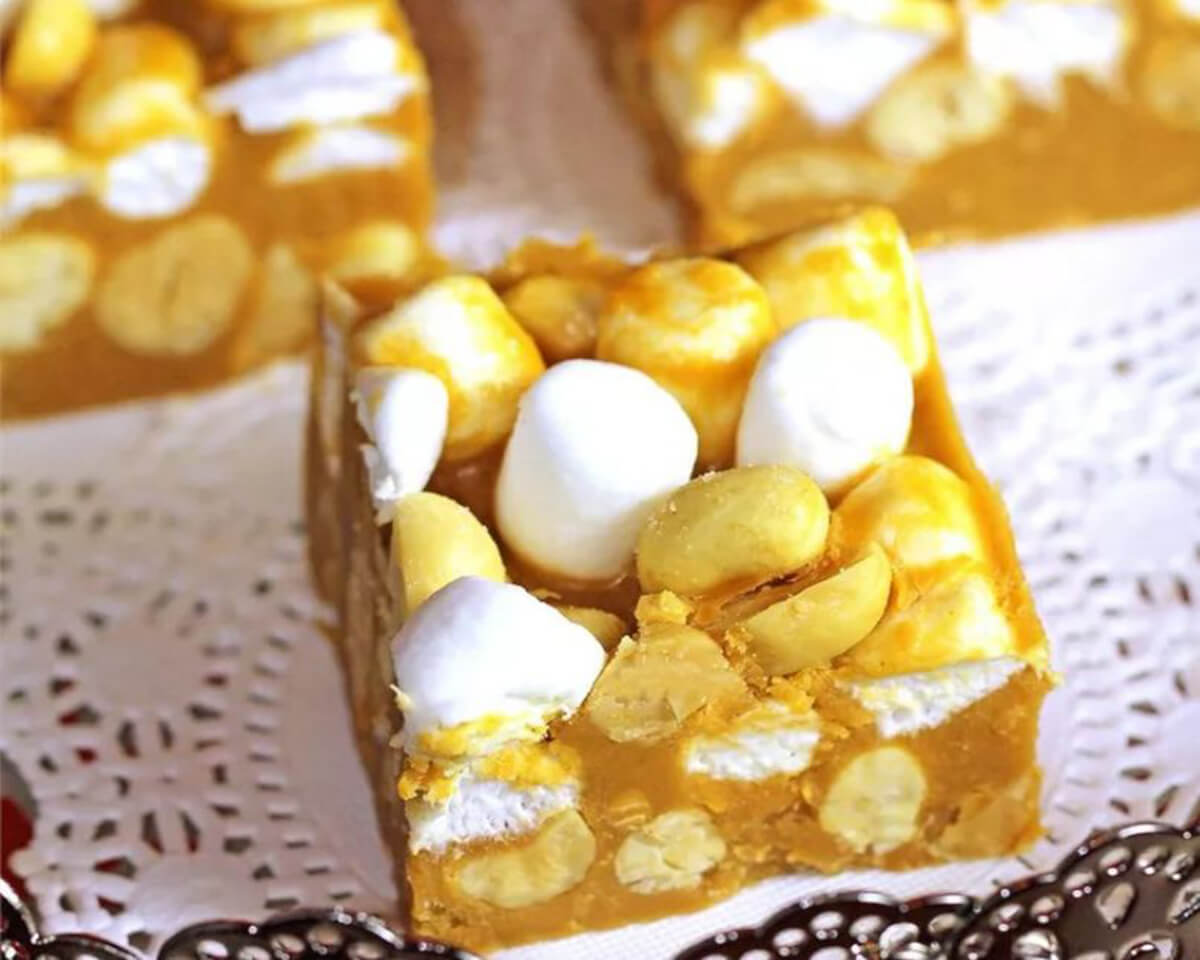
Ingredients:
11 oz package of butterscotch morsels (Toll House)
1 cup creamy peanut butter (Reese’s)
1/3 cup salted sweet cream butter, cubed
2 tbsp heavy cream
1 1/4 tsp pure vanilla extract
5 1/2 cups mini marshmallows (10 oz bag)
Instructions:
1- Line a 9×9 baking dish with parchment paper, leaving an overhang for easy lifting. Lightly spray with nonstick cooking spray.
2- In a heavy-bottomed saucepan, melt together the butterscotch morsels, peanut butter, butter, and heavy cream over medium heat. Stir constantly until smooth. Remove from heat and stir in vanilla. Let cool for 8-10 minutes, stirring occasionally.
3- Stir in mini marshmallows.
4- Evenly spread the mixture into the prepared baking dish. Chill in the fridge for 45 minutes to 1 hour until set.
5- Use the parchment paper overhang to lift the bars out of the pan. Slice into 16 pieces. Keep refrigerated until ready to serve.
3. Tips for Achieving the Best Results
- Use high-quality ingredients for the best flavor and texture.
- Make sure the butterscotch chips and butter are fully melted and smooth before adding the other ingredients.
- When pressing the mixture into the baking dish, apply even pressure to ensure a compact and sturdy base for the bars.
- For a cleaner cut, use a sharp knife and wipe it clean between each cut.
- Store the bars in an airtight container in the refrigerator to maintain their freshness and prevent them from becoming too soft.
4. Variations and Additions
Butterscotch Peanut Butter Bars offer plenty of room for experimentation and personalization. Here are some ideas to add extra flavor and texture to your bars:
- Chocolate Chip Butterscotch Peanut Butter Bars: Fold in a cup of chocolate chips into the mixture before pressing it into the baking dish. The combination of chocolate, butterscotch, and peanut butter creates a delightful trifecta of flavors.
- Nutty Bars: Add a crunchy element by incorporating chopped peanuts, almonds, or cashews into the mixture. These nuts will provide a satisfying texture and complement the peanut butter flavor.
- Salted Caramel Drizzle: Prepare a quick salted caramel sauce and drizzle it over the top of the bars. The contrast between the sweet butterscotch and the salty caramel creates a divine flavor combination.
Feel free to experiment with your own variations by incorporating your favorite ingredients or flavors into the bars.
5. Serving and Presentation Ideas
- Serve the Butterscotch Peanut Butter Bars chilled, straight from the refrigerator for a firm and refreshing treat.
- Dust the bars with a sprinkle of powdered sugar or cocoa powder to add a touch of elegance and visual appeal.
- For an indulgent experience, serve the bars with a scoop of vanilla ice cream or a dollop of whipped cream.
- Garnish each bar with a drizzle of melted butterscotch or a sprinkle of crushed peanuts for an extra-special touch.
Presentation plays a significant role in enhancing the overall enjoyment of the dessert. Take the time to arrange the bars neatly on a dessert platter or individual serving plates for an appetizing presentation.
6. The Joy of Indulging in Butterscotch Peanut Butter Bars
Butterscotch Peanut Butter Bars are more than just a dessert—they are a source of joy and satisfaction. From the moment you take your first bite, you’ll be greeted with a delightful combination of flavors and textures. The buttery sweetness of the butterscotch, the creamy nuttiness of the peanut butter, and the rich indulgence of the chocolate (if added) will dance on your taste buds.
As you savor each bite, allow yourself to be fully present in the moment, embracing the sheer delight and happiness that this dessert brings. These bars have the power to evoke nostalgia, create smiles, and foster a sense of togetherness when shared with loved ones.
So, go ahead and treat yourself to a batch of Butterscotch Peanut Butter Bars. Indulge in the joy they bring and let your taste buds revel in the harmonious combination of butterscotch and peanut butter. Whether you enjoy them as an after-dinner dessert or share them at a special occasion, these bars are sure to bring a moment of pure bliss.
FAQs
Q1: Can I use crunchy peanut butter instead of creamy?
Absolutely! If you prefer a bit of crunch in your bars, feel free to substitute creamy peanut butter with crunchy peanut butter. The added texture will provide an extra layer of enjoyment.
Q2: Can I use a different type of cracker crumbs instead of graham crackers?
Certainly! While graham cracker crumbs are traditionally used in this recipe, you can experiment with other types of cracker crumbs. Try using chocolate wafer crumbs or even crushed pretzels for a unique twist.
Q3: Can I freeze Butterscotch Peanut Butter Bars?
Yes, you can freeze Butterscotch Peanut Butter Bars for longer storage. Ensure they are tightly wrapped or stored in an airtight container to prevent freezer burn. Thaw them in the refrigerator before serving.
Q4: Can I make these bars ahead of time?
Absolutely! Butterscotch Peanut Butter Bars can be made in advance, making them a convenient dessert for parties or gatherings. Simply store them in the refrigerator until ready to serve.
Q5: Can I omit the chocolate topping?
Of course! The chocolate topping is optional and can be omitted if desired. The bars will still be delicious without it. However, if you’re a chocolate lover, the addition of chocolate drizzle will add an extra layer of decadence.