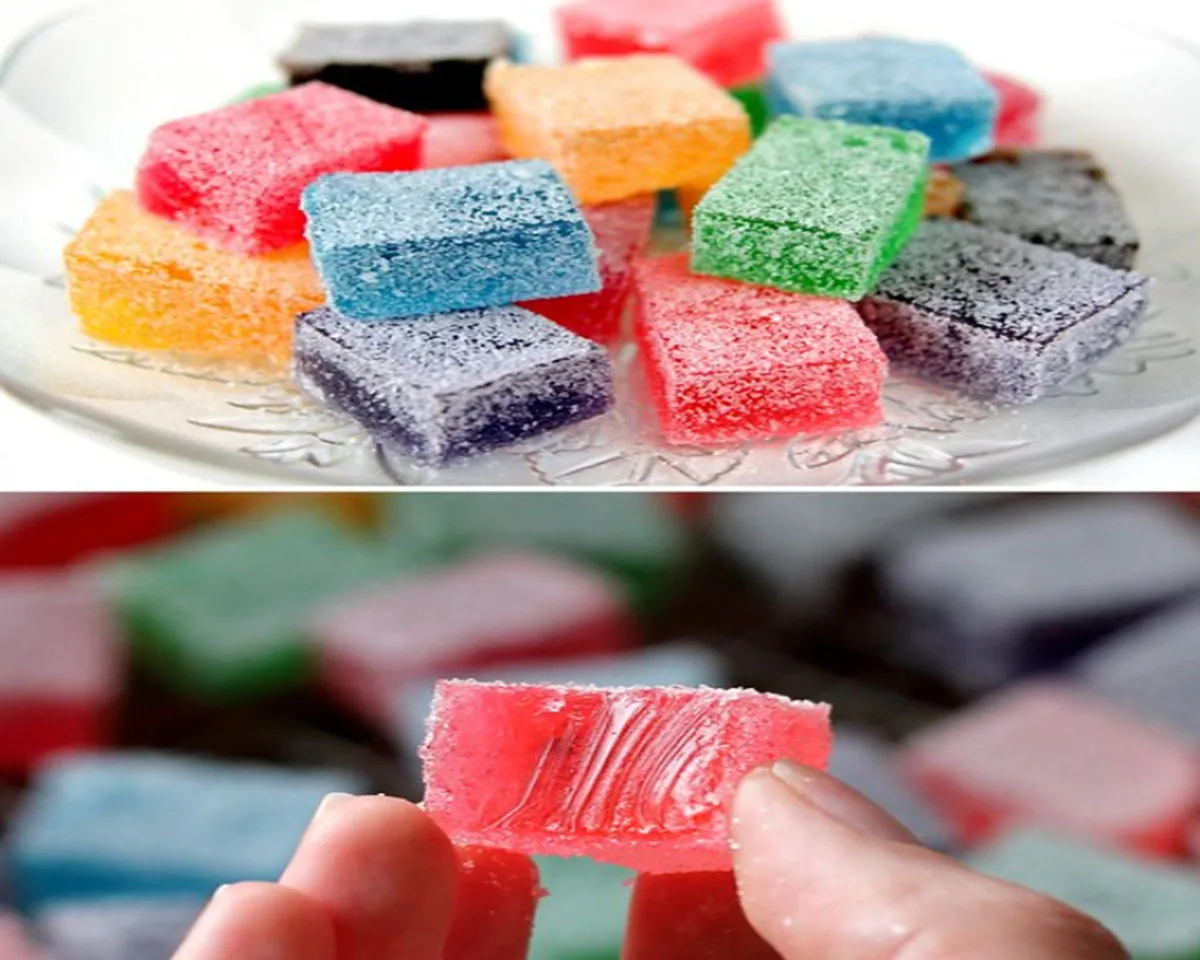
I still remember watching my grandmother make hard candy on our old gas stove every Christmas. She pulled out a heavy copper saucepan, a candy thermometer clipped to the side, and a bottle of peppermint oil that made the whole kitchen smell like a winter wonderland. As a kid, I sat on a stool and watched the sugar mixture bubble and swirl. She let me add a few drops of red food coloring, and I felt like a mad scientist. When she poured the molten candy onto a greased marble slab, I thought she had performed actual magic. Then came the best part. She let me break the cooled sheet of hard candy into jagged, sparkly shards with a small hammer. Those homemade peppermint drops tasted ten times better than any store-bought candy I had ever tried. Years later, I decided to recreate that memory. I burned my first batch. I scorched the second. But on the third try, I finally nailed that perfect, glassy, crystal-clear hard candy that shatters cleanly and melts on your tongue. Now I make it every holiday season, and I want to teach you how. This hard candy recipe uses just four basic ingredients, requires no special molds, and delivers that nostalgic, satisfying crunch in under an hour. Let me walk you through the sweet science of homemade candy.
PART 1: Understanding the Science Behind Perfect Hard Candy
The Role of Sugar, Corn Syrup, and Water
Hard candy has a deceptively simple ingredient list. You need granulated sugar, light corn syrup, and water. That is it. But each ingredient plays a critical role. Granulated sugar (1 cup) provides the sweetness and the crystalline structure. However, sugar alone wants to recrystallize into gritty lumps. That is where corn syrup enters. Light corn syrup (1/4 cup) contains glucose and other sugars that interfere with crystallization. It keeps the final hard candy smooth, clear, and glassy instead of grainy. The water (1/2 cup) dissolves the sugar so it can heat evenly. As the mixture boils, the water evaporates, leaving behind a supersaturated sugar solution. Without corn syrup, your candy would turn into a sugary, cloudy mess. Never substitute honey, maple syrup, or agave. They contain different sugars and moisture levels that throw off the temperature calculations.
The Hard Crack Stage and Why Temperature Matters
Candy-making relies on precise temperature control. For hard candy, you need to reach the hard crack stage, which happens at 310°F (154°C). At this temperature, the sugar syrup contains almost no water. When you drop a small amount into cold water, it forms hard, brittle threads that snap cleanly. If you stop at 290°F, you get soft crack stage, which yields sticky, chewy candies like toffee. If you stop at 250°F, you get firm ball stage, perfect for caramels. Going over 320°F risks burning the sugar, turning it bitter and dark. Invest in a reliable candy thermometer. Clip it to the side of your saucepan before you start heating. Make sure the bulb does not touch the bottom of the pan, or it will give a false reading. Patience during this stage separates gorgeous, shiny candy from burnt, wasted sugar.
PART 2: Essential Tools and Ingredient Preparations
Must-Have Equipment for Success
Before you heat a single grain of sugar, gather your tools. You need a small, heavy-bottomed saucepan. Thin pans create hot spots that burn sugar. A candy thermometer with a clip is non-negotiable. You also need a long-handled wooden spoon or silicone spatula for stirring. Prepare your cooling surface. You can pour the candy into silicone molds for shaped lollipops, or you can pour it onto a baking sheet lined with aluminum foil. If using foil, lightly dust it with powdered sugar to prevent sticking. Alternatively, grease the foil with a thin layer of vegetable oil. Have your food coloring and flavoring oil ready near the stove. You must work quickly once the candy reaches temperature. For flavoring, use candy-specific flavoring oils, not water-based extracts. Water-based flavors introduce moisture that can cause crystallization. Good options include peppermint, cinnamon, clove, citrus, or fruit oils.
Safety Precautions for Working with Hot Sugar
Molten hard candy reaches over 300°F. That is hot enough to cause severe burns instantly. Keep a bowl of cold water nearby in case of splashes. Wear long sleeves and use oven mitts when handling the saucepan. Do not let children near the stove during the boiling process. When you add the flavoring and coloring, steam will rise violently. Keep your face away and whisk quickly. If you accidentally get hot sugar on your skin, run it under cool water immediately. Do not try to wipe it off. The sugar hardens and sticks. Also, work on a heat-resistant surface. Pouring hot candy onto a flimsy countertop can damage it. A silicone baking mat, marble slab, or thick cutting board works best. Finally, never leave the boiling sugar unattended. The temperature climbs rapidly in the final minutes, and sugar can catch fire if overheated.
PART 3: Step-by-Step Hard Candy Making Process
Boiling the Syrup to the Perfect Temperature
In your small saucepan, combine 1 cup of granulated sugar, 1/2 cup of water, and 1/4 cup of light corn syrup. Stir the mixture gently with a wooden spoon until the sugar looks completely dissolved. Turn the heat to medium-high. Bring the mixture to a rolling boil. Do not stir once it starts boiling. Stirring at this stage encourages crystallization. Clip your candy thermometer to the side of the pan. Watch the temperature rise. After about 5 minutes, the mixture will bubble vigorously. After 8 minutes, it will thicken noticeably. At around 10 minutes, look for 310°F on your thermometer. The bubbles will become smaller and slower. The syrup will turn a pale golden color. Remove the pan from the heat immediately when the thermometer hits 310°F. Let the bubbling action settle for about one minute. This brief rest allows the temperature to even out.
Adding Color, Flavor, and Pouring Quickly
After the resting minute, work swiftly. Add your desired food coloring. Use gel or liquid food coloring; both work. Start with 2 to 3 drops, then adjust. Add 1/2 teaspoon of flavoring oil. Peppermint gives a classic clear or red-striped candy. Cinnamon creates a warm amber hue. Lemon or orange oils produce bright, sunny colors. Whisk everything together quickly but carefully. Keep your face away from the steam. The mixture will bubble and release intense fumes. Whisk until the color and flavor distribute evenly. This entire step should take no more than 15 seconds. Now pour the hot hard candy onto your prepared surface. If using silicone molds, pour carefully into each cavity. If using a foil-lined baking sheet, pour in a steady stream to create a thin, even layer about 1/4-inch thick. Do not spread with a spatula; the candy sets too fast. Let it cool for 2 to 3 minutes until the edges firm up but the center remains pliable.
PART 4: Scoring, Breaking, and Storing Your Hard Candy
The Scoring Technique for Clean Pieces
As the candy cools slightly but has not hardened completely, use a large chef’s knife to score it into small pieces. Score means pressing the knife into the surface without cutting all the way through. Create a grid of bite-sized squares, about 1-inch by 1-inch. Do not try to cut through fully yet. The candy will be too brittle. After scoring, let the hard candy cool completely. This takes about 15 to 20 minutes at room temperature. Once fully hardened, lift the foil or mat. Flex it gently. The scored pieces will snap apart along your lines. If you did not score, you can break the candy into irregular shards with your hands or a small mallet. Irregular pieces look rustic and charming, perfect for gift jars. For lollipops, skip scoring and remove the candy from molds once fully set. Insert lollipop sticks before the candy hardens completely, about 2 minutes after pouring.
Storage Tips and Common Troubleshooting
Store your homemade hard candy in an airtight container at room temperature. Do not refrigerate. The refrigerator introduces moisture that makes the candy sticky and cloudy. Properly stored, hard candy lasts for 6 months or longer. Separate layers with parchment paper to prevent sticking. If your candy turns out sticky or chewy, you did not reach 310°F. Next time, boil longer. If your candy tastes burnt, the temperature went above 320°F or you left it on the heat too long. If your candy looks cloudy or grainy, you stirred after boiling began or you used water-based flavoring. For a festive presentation, layer different colors and flavors in the same pan. Pour one color, let it set for 30 seconds, then pour another color next to it. Swirl gently with a toothpick for a marbled effect.
| Problem | Likely Cause | Solution |
|---|---|---|
| Sticky or chewy candy | Temperature below 310°F | Use candy thermometer; boil longer |
| Burnt taste | Temperature above 320°F | Remove from heat immediately at 310°F |
| Cloudy or grainy texture | Stirring after boil began or water-based flavor | Do not stir once boiling; use flavoring oils |
| Candy stuck to foil | Insufficient greasing or powdered sugar | Dust foil generously with powdered sugar |
| Uneven pieces | Not scoring before fully set | Score within 2-3 minutes of pouring |
Frequently Asked Questions
Can I make hard candy without corn syrup?
Yes, but the candy will be more prone to crystallization. Substitute 1/4 cup of glucose syrup or invert sugar. Do not use honey or maple syrup as direct substitutes; they have different sugar compositions.
Why does my hard candy sweat or become sticky after storage?
Hard candy attracts moisture from humid air. Store it in an airtight container with a silica gel packet or a few grains of rice wrapped in tissue. Avoid making candy on rainy or humid days.
Can I use natural food coloring for hard candy?
Yes, but natural colors like beet powder or turmeric can fade or burn at high temperatures. Gel-based natural colors work better than powders. Expect less vibrant results compared to artificial colors.
How do I make sugar-free hard candy?
Use isomalt instead of sugar. Isomalt behaves similarly but does not crystallize as easily. Follow the same temperature guidelines (310°F). Sugar-free candy often tastes less sweet and may cause digestive issues if eaten in large quantities.
What is the best way to clean hardened sugar from my saucepan?
Fill the pan with water and bring it to a boil. The hardened sugar will dissolve completely. Do not scrape with metal utensils, as that scratches the pan. Pour the hot water out carefully.
Can I double this hard candy recipe?
Yes, but use a larger saucepan. Double all ingredients. The boiling time will increase by about 5 minutes. Watch the thermometer carefully. Larger batches cool faster, so work even more quickly when pouring.
Conclusion
Making hard candy at home feels like learning a secret art passed down through generations. The process requires precision, patience, and a little courage. But the reward outweighs every nervous moment. You get sparkling, jewel-like candies that taste purer and more intense than anything from a store. You also get the joy of customizing flavors and colors for any holiday, party, or gift-giving occasion. My grandmother has been gone for years now, but every time I make her peppermint candy recipe, I feel her standing right next to me at the stove. That is the true magic of homemade candy. It connects you to memories and lets you create new ones. So clip on that candy thermometer. Measure your sugar and corn syrup. Watch that temperature climb. Then pour, score, and break your way to a sweet success. Your kitchen will smell amazing, and your friends will beg for your secret. Share it proudly. Happy candy making.
Full recipe:
Ingredients:
– 1 cup Granulated Sugar
– 1/2 cup Water
– 1/4 cup Light Corn Syrup
– Food Coloring
– 1/2 teaspoon Flavoring Oil
 Instructions:
1. In a small saucepan, combine the granulated sugar, water, and light corn syrup. Stir the ingredients until fully combined.
2. Place the saucepan over medium-high heat and bring the mixture to a boil.
3. Allow the mixture to boil for approximately 10 minutes until it thickens and reaches the hard crack phase, which is about 310 degrees Fahrenheit (use a candy thermometer to check the temperature).
4. Remove the saucepan from the heat and let the boiling action settle for about a minute.
5. Swiftly add the desired food coloring and flavoring oil to the mixture. Be cautious and whisk quickly while keeping your face away from the steam. Thoroughly combine the ingredients.
6. Acting swiftly, pour the candy mixture into molds or onto a sheet of aluminum foil lightly dusted with powdered sugar. Sprinkle additional powdered sugar on top of the candy.
7. As the candy cools slightly, use a large knife to score it into small bite-sized pieces. Once completely cooled, break the candy into pieces.
8. Store the homemade hard candy in an airtight container to maintain its freshness.
Crafting homemade hard candy is a delightful way to enjoy this classic treat, allowing you to customize flavors and colors for your own sweet creations.