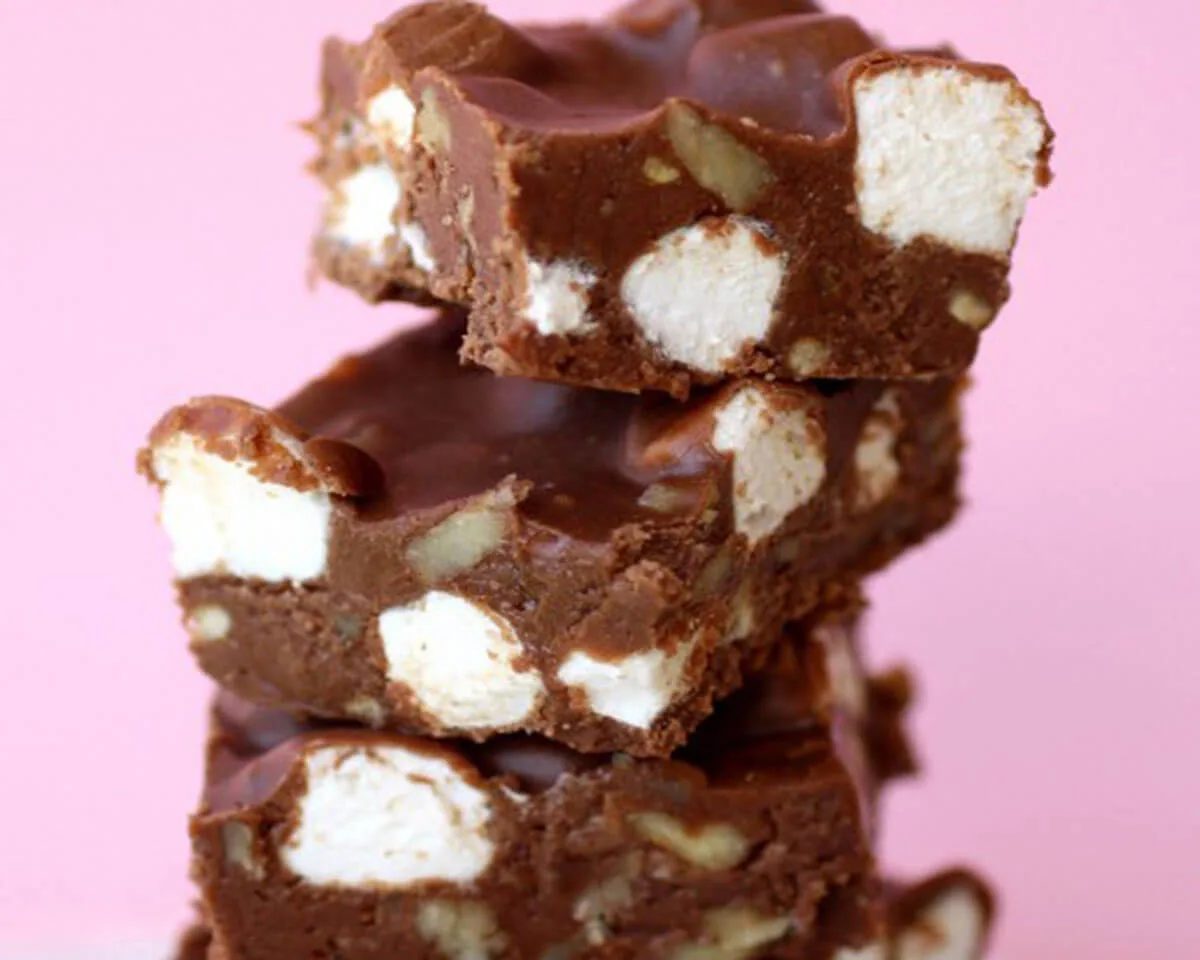
Rocky Road Candy: The Chocolate, Marshmallow, and Peanut Cluster You Will Make on Repeat

Part 1: The Story Behind My Rocky Road Candy Obsession

Rocky Road candy first appeared in my kitchen during a desperate holiday baking marathon. I had promised homemade gifts for ten neighbors, but I ran out of time and energy. My grandmother called and said, “Stop fussing with cookies. Make Rocky Road candy instead.” She walked me through the recipe over the phone. Melt chocolate chips with a little vegetable oil. Stir in miniature marshmallows and roasted peanuts. Scoop onto wax paper. Chill. That first batch of Rocky Road candy came together in fifteen minutes flat. I tasted a cluster while it was still warm, and the combination of creamy chocolate, gooey marshmallow, and salty, crunchy peanuts blew my mind. I made batch after batch that night. My neighbors loved the homemade Rocky Road candy, and they asked for it again the following year. Now this Rocky Road candy has become my signature holiday gift and my go-to when a chocolate craving strikes. I cannot imagine a pantry without the ingredients for this Rocky Road candy.

Why This Rocky Road Candy Saves Every Sweet Tooth

Most homemade candies require candy thermometers, constant stirring, and precise timing. This Rocky Road candy asks for none of that. You melt chocolate chips in the microwave, stir in marshmallows and peanuts, and scoop. That is it. The vegetable oil keeps the chocolate smooth and glossy. The miniature marshmallows add chewy, pillowy pockets. The dry roasted cocktail peanuts bring salty crunch and nutty richness. Every bite of this Rocky Road candy delivers a perfect contrast of textures and flavors. You can whip up a batch in under twenty minutes, and it keeps in the fridge for weeks. I have brought this Rocky Road candy to potlucks, movie nights, and birthday parties. People always ask for the recipe. Kids love scooping the clusters, and adults appreciate how quickly it comes together. Whether you need a last-minute gift, a easy dessert, or a simple chocolate fix, this Rocky Road candy will never let you down.

Part 2: Essential Ingredients for Perfect Rocky Road Candy

The Chocolate Base: Two Types for Richness

Great Rocky Road candy starts with high-quality chocolate. Use two cups of semi-sweet chocolate chips and two cups of milk chocolate chips. The semi-sweet provides deep, dark cocoa flavor. The milk chocolate adds creamy sweetness. Together, they create a balanced, crowd-pleasing taste. You can use all semi-sweet for a less sweet version or all milk for a sweeter candy. Avoid chocolate baking bars because they do not melt as smoothly. Chocolate chips contain stabilizers that help them hold their shape, but when melted with oil, they become perfectly fluid. For a richer Rocky Road candy, use dark chocolate chips instead of semi-sweet. For a white chocolate version, substitute white chocolate chips and add dried cranberries and pistachios.

Below is a table comparing chocolate options.

Chocolate Type Sweetness Level Best For
Semi-sweet chips Moderate Balanced, not too sweet
Milk chocolate chips High Classic sweet Rocky Road
Dark chocolate chips Low, bitter notes Adult, less sweet version
White chocolate chips Very high Different flavor profile

Mix-Ins and Oil: The Perfect Texture

Vegetable oil, three tablespoons, is essential. It thins the melted chocolate so it coats the marshmallows and peanuts evenly. Without oil, the chocolate seizes and becomes thick and lumpy. Use canola, coconut, or avocado oil as substitutes. Do not use butter because it contains water that can seize chocolate. For the marshmallows, use two cups of miniature marshmallows. They fit perfectly into each cluster and melt slightly when stirred into warm chocolate, creating a gooey, fudgy interior. For the nuts, use one and a half cups of dry roasted cocktail peanuts. The saltiness of the peanuts contrasts beautifully with the sweet chocolate and marshmallows. You can substitute almonds, walnuts, or pecans. For a nut-free Rocky Road candy, replace peanuts with pretzel pieces, crushed graham crackers, or toasted coconut.

Part 3: Step-by-Step Instructions for Rocky Road Candy

Melting the Chocolate and Mixing

Start your Rocky Road candy by lining two baking sheets with wax paper or parchment paper. Set them aside. In a large, microwave-safe mixing bowl, combine two cups of semi-sweet chocolate chips, two cups of milk chocolate chips, and three tablespoons of vegetable oil. Microwave the mixture in thirty-second intervals. Stir after each interval with a rubber spatula. After two to three intervals, the chocolate will look almost melted. Continue microwaving in fifteen-second bursts and stirring until completely smooth and glossy. Do not overheat. Chocolate burns easily and turns grainy. Once melted, let the chocolate cool to lukewarm. This step is crucial. If the chocolate is too hot, it melts the marshmallows into a sticky puddle. If it is too cool, it thickens before you add the mix-ins. Test by touching the bowl. It should feel warm but not hot.

Scooping and Chilling the Clusters

Pour two cups of miniature marshmallows and one and a half cups of dry roasted cocktail peanuts into the cooled chocolate. Stir gently with a spatula until every marshmallow and peanut wears a coat of chocolate. Do not over-stir, or you crush the marshmallows. Use a one and a half tablespoon cookie scoop to portion the Rocky Road candy onto the prepared baking sheets. Scoop and tap the handle to release each cluster. Space the clusters about two inches apart so they do not touch. If you do not have a scoop, use two spoons to drop rounded tablespoons of the mixture. Do not worry about perfect shapes. Rocky Road candy looks best when it is rustic and bumpy. Place the baking sheets in the refrigerator. Chill for at least one hour until the chocolate sets completely. The clusters become firm but still slightly soft inside from the marshmallows. Once set, transfer your Rocky Road candy to an airtight container. Store in the refrigerator.

Part 4: Storing, Serving, and Customizing Your Rocky Road Candy

Proper Storage and Shelf Life

Store your Rocky Road candy in an airtight container in the refrigerator. The cold temperature keeps the chocolate firm and prevents the marshmallows from getting sticky. The candy stays fresh for up to two weeks. You can also store it at room temperature for a few days, but the chocolate may soften and the marshmallows may become tacky. For longer storage, freeze Rocky Road candy for up to three months. Place the clusters in a single layer in a freezer-safe container, separating layers with wax paper. Thaw overnight in the refrigerator before serving. Do not thaw at room temperature because condensation makes the chocolate bloom (turn white and streaky). Bloom does not affect safety but looks less appealing. Before serving, let the Rocky Road candy sit at room temperature for ten minutes. This brings out the chocolate’s flavor and softens the marshmallows slightly.

Serving Ideas and Creative Variations

Rocky Road candy shines as a standalone treat, but you can use it in other ways. Crumble the clusters over vanilla ice cream for an easy sundae. Chop them into pieces and fold into brownie batter before baking. Package the clusters in cellophane bags tied with ribbon for homemade holiday gifts. Place a bowl of Rocky Road candy on a dessert table or movie night snack spread. For creative variations, try these twists. Swap the peanuts for toasted almonds, walnuts, or pecans. Add half a cup of shredded coconut along with the nuts. Stir in a quarter cup of mini pretzel twists for salty crunch. Use dark chocolate and add dried cherries and pistachios for a festive version. Make s’mores Rocky Road by adding crushed graham crackers and using all milk chocolate. For a spicy kick, add a half teaspoon of cayenne pepper to the melted chocolate. Each variation keeps the soul of Rocky Road candy intact while letting you play with flavors.

Frequently Asked Questions

Can I use regular-sized marshmallows instead of miniatures?
Yes, but chop them into smaller pieces. Regular marshmallows create larger, chewier pockets. Cut each marshmallow into quarters before adding to the chocolate. Miniatures distribute more evenly.

Why is my chocolate seizing or becoming lumpy?
Your chocolate likely got too hot, or a drop of water entered the bowl. Melt chocolate in short thirty-second bursts and stir well. Ensure your bowl and spatula are completely dry. If the chocolate seizes, stir in an extra tablespoon of vegetable oil to smooth it out.

Can I make Rocky Road candy without nuts?
Absolutely. Replace the peanuts with an equal volume of crushed pretzels, rice cereal, toasted coconut, or additional marshmallows. The texture changes but remains delicious.

How do I get clean, round clusters?
Use a cookie scoop for uniform portions. If using two spoons, scrape the mixture cleanly and drop it without pressing. Work quickly before the chocolate sets. If the chocolate hardens in the bowl, microwave for ten seconds and stir.

Can I use chocolate melting wafers instead of chips?
Yes. Melting wafers (candy melts) already contain oil and produce a very smooth coating. Use the same amount, and you may reduce or omit the vegetable oil. Follow package instructions for melting.

Is Rocky Road candy gluten-free?
Yes, if you use gluten-free chocolate chips and nuts. Most chocolate chips are gluten-free, but always check labels. The recipe contains no flour or gluten-containing ingredients unless you add pretzels or graham crackers.

Conclusion

Rocky Road candy proves that the best treats often come from the simplest recipes. With chocolate chips, vegetable oil, miniature marshmallows, and salted peanuts, you create clusters of creamy, crunchy, chewy bliss in under twenty minutes. No candy thermometers, no complicated steps. Just melt, mix, scoop, and chill. Store this Rocky Road candy in the fridge for two weeks or freeze it for months. Give it as a gift, serve it at parties, or keep a batch hidden in the back of the refrigerator for late-night cravings. Experiment with different nuts, add coconut or pretzels, or make a white chocolate version. Now grab a microwave-safe bowl, a bag of chocolate chips, and a jar of peanuts. Make this Rocky Road candy today. One bite of that smooth chocolate, gooey marshmallow, and salty peanut will have you hooked. Your sweet tooth will thank you.

Full recipe:

Ingredients:

  • ▢2cups semi-sweet chocolate chips
  • ▢2cups milk chocolate chips
  • ▢3tablespoons vegetable oil
  • ▢2cups miniature marshmallows
  • ▢1½cups dry roasted cocktail peanuts

INSTRUCTIONS

  1. Line 2 baking sheets with wax paper and set them aside.
  2. Add the chocolate chips and vegetable oil to a large heat-safe mixing bowl. Heat the chocolate chips and oil in the microwave in 30-second intervals, stirring after each interval until the chocolate is completely melted and smooth.
  3. Allow the chocolate to cool to lukewarm before stirring in the miniature marshmallows and peanuts until the marshmallows and nuts are completely coated.
  4. Use a 1½ tablespoon cookie scoop to scoop the candy clusters. Space the clusters about 2 inches apart on the prepared baking sheets. Allow the candy to chill in the refrigerator to completely set before serving.


Leave a Comment