Turkey Gravy: The Liquid Gold That Transforms Any Meal

I still remember the first Thanksgiving I tried to make turkey gravy without my mother standing next to me. I was twenty-two, living in a tiny apartment, and hosting seven friends. I roasted the turkey beautifully. Golden skin, juicy meat. Then came the moment of truth. I poured the drippings into a saucepan, added some flour, and started whisking. Nothing happened. The liquid stayed thin and watery. I added more flour. Then lumps appeared. Big, ugly, floury lumps. My friend Sarah laughed and said, “Call your mom.” I did. She walked me through making a proper roux, whisking slowly, and adding warm broth. Fifteen minutes later, I poured smooth, glossy turkey gravy over everything on the table. My friends called it the best part of the meal. That day, I learned that turkey gravy is not an afterthought. It is the soul of a roast dinner. Now I make turkey gravy for Thanksgiving, Christmas, and even random Sunday meals. A jar of homemade turkey gravy in the fridge turns leftovers into gold. Let me teach you everything I have learned about making rich, lump-free, deeply flavorful turkey gravy.

Part 1: Understanding Turkey Gravy – History and Essentials

What Is Turkey Gravy and Why Does It Matter?

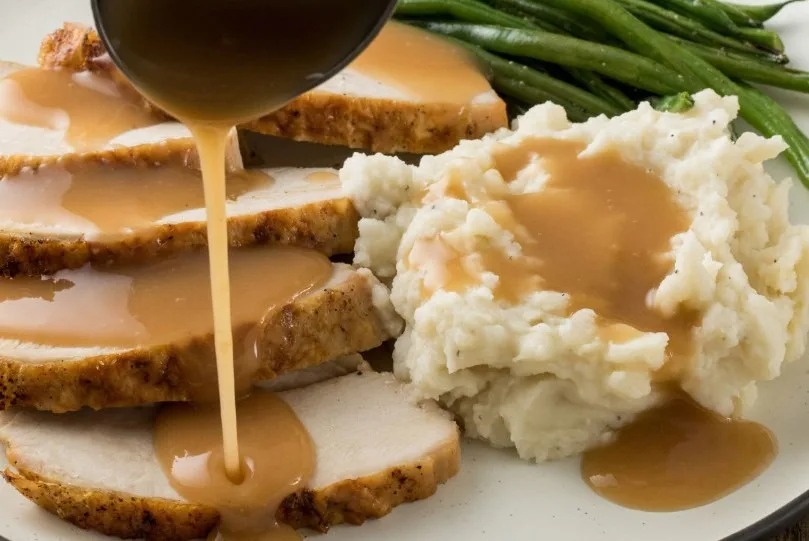
Turkey gravy is a savory sauce made from turkey drippings, flour or another thickener, and broth or stock. It brings richness, moisture, and umami to roasted meats, mashed potatoes, stuffing, and vegetables. Without gravy, turkey tastes dry and plain. With gravy, every bite becomes juicy and satisfying. Gravy bridges flavors. It pulls together the salty, savory, and earthy notes from the bird and the herbs. A well-made turkey gravy also adds visual appeal. A glossy, brown cascade over white mashed potatoes creates a picture-perfect plate. Beyond Thanksgiving, turkey gravy works on chicken, pork chops, roasted vegetables, and even french fries. Once you master this sauce, you will find excuses to make it often.

The Fascinating Origins of Gravy

Gravy has ancient roots. The Romans enjoyed a fermented fish sauce called garum. That is not exactly our gravy, but the idea of a savory liquid condiment started there. Medieval European cooks thickened meat juices with bread crumbs or ground almonds. By the 17th century, English cooks began using flour and butter to make what we now call gravy. The word “gravy” probably comes from a mistaken translation of a Old French cooking term. Early American settlers brought gravy traditions with them. Turkey gravy became a Thanksgiving staple because turkey was plentiful. Over centuries, families developed their own secret techniques. Some add hard-boiled eggs. Others use coffee or red wine. But the core remains the same. Collect the drippings, thicken them, season them, and pour them over everything.

Part 2: Ingredients and Equipment for Foolproof Turkey Gravy

The Classic Ingredients You Need

Start with turkey drippings. After roasting your turkey, pour the pan juices into a fat separator or a glass bowl. Let the fat rise to the top. You will need both the fat and the watery juices underneath. The fat helps make the roux. The juices add deep roasted flavor. You also need all-purpose flour or cornstarch for thickening. Use broth or stock, preferably turkey or chicken, to control the consistency. Season with salt, black pepper, and optional herbs like thyme or sage. A splash of white wine or sherry adds complexity but is not required. The table below summarizes everything.

Ingredient Quantity (for 2 cups gravy) Notes
Turkey drippings (fat and juice) ½ cup fat + 1 cup juices Separate fat from liquid
All-purpose flour ¼ cup For roux
Turkey or chicken broth 1–2 cups Low-sodium preferred
Salt To taste Start with ½ tsp
Black pepper ½ tsp Freshly ground
Optional: fresh thyme 1 tsp leaves Adds earthy note

Must-Have Tools and Smart Substitutions

A fat separator is the best tool for gravy. It looks like a glass measuring cup with a spout at the bottom. Pour the pan drippings in. The fat floats. Pour the juices from the bottom spout. If you do not have one, use a spoon to skim fat off the top. You also need a whisk, a medium saucepan, and a ladle. For gluten-free gravy, swap flour for cornstarch or a gluten-free flour blend. For low-fat gravy, skip the separated fat. Use a little oil or butter instead. For vegan gravy, use roasted vegetable drippings and plant-based butter. The technique stays exactly the same.

Part 3: Step-by-Step Turkey Gravy Recipe

Collecting and Preparing the Turkey Drippings

After you remove your roasted turkey from the pan, pour the pan juices into a fat separator. Tilt the roasting pan to gather all the liquid. Scrape up the browned bits stuck to the pan. Those bits are pure flavor. Use a spatula or a splash of broth to deglaze the pan. Add that liquid to the separator. Let the mixture sit for five minutes. The fat rises. Pour the defatted juices into a measuring cup. Reserve two tablespoons of the fat in a small bowl. If you do not have enough fat, add butter or oil to reach two tablespoons. You want about two cups of defatted juices. If you have less, supplement with store-bought broth.

Making the Perfect Roux and Combining

First, set your saucepan over medium heat. Add the reserved two tablespoons of turkey fat. Let it melt. Second, sprinkle in a quarter cup of all-purpose flour. Whisk constantly. The mixture will bubble and turn pale golden. Cook for two to three minutes. This removes the raw flour taste. Third, slowly pour in the defatted turkey juices while whisking. The mixture will seize up and look like paste. Keep whisking. Fourth, pour in one cup of warm turkey broth. Continue whisking. The gravy will loosen and start to thicken. Fifth, bring the gravy to a gentle simmer. Reduce the heat to low. Simmer for five to seven minutes. Stir occasionally with a whisk. The gravy should coat the back of a spoon. Sixth, season with salt and pepper. Taste and adjust. Add fresh thyme if desired. Finally, pour the finished turkey gravy through a fine-mesh strainer for an ultra-smooth texture. Serve hot.

Troubleshooting Lumps and Consistency

Lumpy gravy happens when you add cold liquid to hot roux too quickly, or when you stop whisking. To fix lumps, pour the gravy through a strainer into a clean pot. For stuck lumps, use an immersion blender for two seconds. Never over-blend or the gravy becomes gummy. If your gravy is too thin, make a slurry. Mix one tablespoon of cornstarch with two tablespoons of cold water. Whisk it into simmering gravy. Cook for two minutes. It will thicken instantly. If your gravy is too thick, whisk in warm broth one tablespoon at a time. Do not add cold liquid, or you will get lumps.

Part 4: Beyond the Basics – Variations, Pairings, and Leftovers

Creative Turkey Gravy Variations to Try

Do not stop at classic gravy. Try mushroom gravy. Sauté a cup of sliced mushrooms in butter before making the roux. Add them to the finished gravy. For giblet gravy, simmer the turkey giblets (except the liver) in broth for an hour. Chop them finely and stir into the gravy at the end. For roasted garlic gravy, roast a whole head of garlic until soft. Squeeze the cloves into the gravy before simmering. For a spicy kick, add a pinch of cayenne pepper or a dash of hot sauce. For a red wine gravy, replace half the broth with dry red wine. Simmer for ten minutes to cook off the alcohol.

Pairing Turkey Gravy with More Than Turkey

Turkey gravy belongs on mashed potatoes. That is non-negotiable. But do not stop there. Drizzle it over roasted vegetables like carrots, parsnips, or Brussels sprouts. Spoon it onto stuffing or dressing. Use it as a dipping sauce for crusty bread. Pour it over open-faced turkey sandwiches. Mix it into cooked rice or quinoa. Use it as a topping for baked potatoes or french fries. For a Canadian twist, make turkey gravy poutine. Layer french fries, cheese curds, and hot turkey gravy. The gravy melts the cheese. Each bite is salty, creamy, and savory. You can also freeze leftover gravy in ice cube trays. Pop out a cube and melt it over a quick weeknight chicken breast.

Storing, Freezing, and Repurposing Leftover Gravy

Store leftover turkey gravy in an airtight container in the refrigerator for up to four days. Reheat gently on the stovetop over low heat. Whisk in a splash of broth to restore the consistency. Do not microwave gravy unless you stir every twenty seconds. Microwaves heat unevenly and can cause the fat to separate. Freeze gravy for up to three months. Pour cooled gravy into freezer bags or small containers. Leave headspace for expansion. Thaw overnight in the refrigerator. Reheat as above. If the gravy separates after freezing, whisk vigorously or use an immersion blender to bring it back together. Repurpose leftover gravy as a soup base. Thin it with broth, add shredded turkey and vegetables, and you have a quick turkey soup. Use it as a binder for turkey pot pie or shepherd’s pie. Mix it into cooked pasta with leftover turkey for a quick casserole.

Frequently Asked Questions

Can I make turkey gravy ahead of time?
Yes. Make the gravy up to three days in advance. Store it in the refrigerator. Reheat gently on the stovetop, adding broth as needed. The flavor often improves after a day.

How do I make turkey gravy without drippings?
Use turkey or chicken broth, two tablespoons of butter, and two tablespoons of flour. Make a roux with the butter and flour, then whisk in two cups of warm broth. Add a teaspoon of poultry seasoning and a splash of soy sauce for depth.

Why is my turkey gravy greasy?
You did not remove enough fat from the drippings. Use a fat separator. If already made, chill the gravy slightly. The fat solidifies on top. Scoop it off.

Can I use cornstarch instead of flour?
Yes. For each cup of liquid, use one tablespoon of cornstarch mixed with one tablespoon of cold water. Whisk into simmering drippings. Do not boil after adding or the gravy will thin again.

How do I fix salty gravy?
Add a peeled raw potato to the gravy and simmer for ten minutes. The potato absorbs salt. Remove the potato before serving. You can also add more unsalted broth or a splash of cream.

What is the best way to reheat frozen gravy?
Thaw in the refrigerator overnight. Transfer to a saucepan. Reheat over low heat, whisking often. Add a tablespoon of broth or water to loosen it. Do not boil.

Conclusion

Turkey gravy transforms a simple roasted bird into a memorable feast. It connects us to centuries of cooking tradition. It saves dry turkey and makes mashed potatoes sing. You now have a complete guide to making smooth, flavorful turkey gravy from scratch. You know how to collect drippings, build a roux, fix lumps, and adjust consistency. You have creative variations to try and storage tips to reduce waste. So the next time you roast a turkey, do not pour those drippings down the sink. Turn them into liquid gold. Grab your whisk, heat your saucepan, and pour that velvety gravy over everything on your plate. Your family will ask for seconds of the gravy before the turkey. And you will smile, knowing you made magic from simple ingredients.

Print
clock clock iconcutlery cutlery iconflag flag iconfolder folder iconinstagram instagram iconpinterest pinterest iconfacebook facebook iconprint print iconsquares squares iconheart heart iconheart solid heart solid icon
Turkey Gravy

Turkey gravy


  • Author: Lora

Description

Discover the art of making turkey gravy, its rich history, innovative flavors, and the joy of repurposing leftovers in this comprehensive guide to culinary perfection.


Ingredients

– Pan drippings from a roasted turkey
– 1/4 cup all-purpose flour
– 2 cups chicken or turkey broth
– Salt and pepper to taste

Instructions

1. After you’ve roasted your turkey, remove it from the roasting pan and let it rest on a cutting board. Place the roasting pan with all the drippings (including fat and flavorful bits) on the stovetop over medium heat.
2. Sprinkle the flour over the drippings in the pan. Use a whisk to stir the flour into the drippings, creating a smooth paste. Cook this paste for a couple of minutes to get rid of the raw flour taste.
3. Gradually pour in the chicken or turkey broth while continuously whisking. Keep stirring to prevent lumps. If your gravy appears too thick, you can add more broth until it reaches your desired consistency.
4. Bring the mixture to a gentle boil, and then reduce the heat to a simmer. Let it cook for a few minutes to thicken and allow the flavors to meld.
5. Taste the gravy and season with salt and pepper as needed. Be mindful that the pan drippings may already contain some salt, so adjust accordingly.
6. Once you’re satisfied with the taste and thickness, remove the gravy from the heat.
7. If you want a smoother consistency, you can strain the gravy through a fine mesh strainer or cheesecloth into a serving container.
Your homemade turkey gravy is now ready to be served alongside your roasted turkey or any other dishes you prefer.

Leave a Comment

Recipe rating