
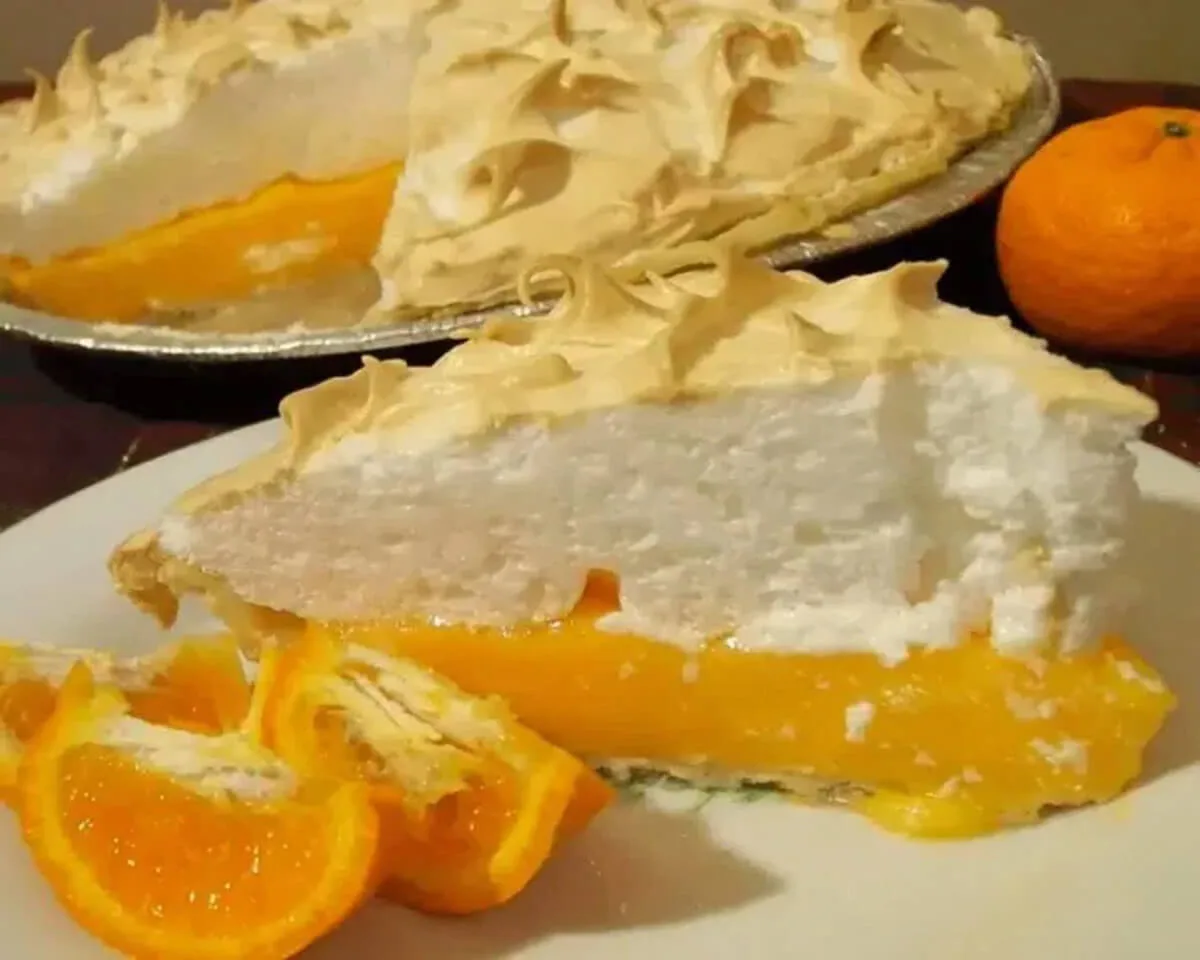
There is a specific kind of culinary magic that occurs when the bright, acidic profile of citrus meets the cloud-like, ethereal sweetness of a perfectly whipped meringue. For decades, the Lemon Meringue Pie has reigned supreme as the quintessential representative of this duo, but there is an equally enchanting, arguably more sophisticated relative that deserves a place on your pedestal: the Orange Meringue Pie. This dessert is not merely a variation; it is a celebration of the orange in all its vibrant glory. While lemon provides a sharp, bracing wake-up call to the palate, orange offers a complex, floral sweetness that feels like a concentrated burst of sunshine.
The journey of creating an Orange Meringue Pie is an exercise in the artistry of balance. It is a dessert of contrasts—the golden, buttery crunch of the crust, the velvety density of the citrus curd, and the marshmallow-soft peaks of the meringue. It is a showstopper that commands attention at any dinner table, its bright orange hue peeking through toasted, golden-brown valleys of fluff. Whether you are a seasoned baker looking to expand your repertoire or a novice aiming to impress, this guide will walk you through every nuance of crafting this masterpiece.
The Foundation: Selecting the Perfect Citrus
To craft a truly world-class Orange Meringue Pie, you must begin with the source of the flavor. Not all oranges are created equal when it comes to baking. Navel oranges are excellent for their sweetness and lack of seeds, while Valencia oranges are prized for their high juice content. For those who want to introduce a touch of drama, Blood Oranges can provide a deeper, raspberry-like undertone and a stunning crimson-orange filling.
The zest is where the essential oils reside, and it is the key to providing that “citrusy zing” mentioned in our introduction. When you grate the orange zest, you are releasing aromatic compounds that provide a floral depth that juice alone cannot replicate. This pie uses a combination of orange juice for sweetness and body, and a touch of lemon juice to provide the necessary acidity to help the filling set and keep the flavor from becoming cloyingly sweet.
The Architecture of the Crust
Every great pie begins with its foundation. The crust serves as the golden embrace for the luscious filling. In this recipe, we utilize a 9-inch unbaked pie crust. The decision between a classic buttery pastry crust and a graham cracker variation is yours to make, but each offers a different experience. A traditional flaky pastry provides a savory, salt-flecked counterpoint to the sweet filling, while a graham cracker crust adds a honeyed, toasted-nut profile that complements the floral notes of the orange.
The technique used here is called “blind baking.” Because the orange filling is cooked on the stovetop and then briefly finished in the oven with the meringue, the crust needs a head start. By preheating the oven to 400°F (205°C) and weighted with pie weights or dried beans, we ensure the crust doesn’t puff up or shrink down the sides of the pan. This creates a crisp, structurally sound vessel that won’t become soggy once the filling is added.
Masterclass in Citrus Curd: The Filling
The heart of the pie is the orange filling. Unlike a cake batter, this is a curd—a mixture thickened by the gelatinization of starch and the coagulation of egg yolks. The process begins in a small saucepan, combining sugar, cornstarch, and a pinch of salt. Cornstarch is the thickening agent of choice here; it provides a translucent, glossy finish and a stable structure that allows for clean slices.
As you whisk in the orange juice, lemon juice, and water, you are creating a slurry. The addition of four egg yolks provides the richness and that characteristic velvety mouthfeel. The cooking process requires your full attention. Over medium heat, the mixture will go from a thin liquid to a thick, bubbling lava in a matter of minutes. This is the moment of culinary alchemy—when the heat causes the starch molecules to swell and burst, trapping the liquid in a firm gel.
Once removed from the heat, stirring in the butter and orange zest adds a final layer of luxury. The butter emulsifies into the curd, giving it a professional sheen and a rounded flavor. For those who enjoy a bit of textural surprise, the optional addition of diced orange segments provides “bursts” of juice within the smooth filling, heightening the sensory experience of every bite.
The Science of the Perfect Meringue
Meringue is often seen as the most intimidating part of this dessert, but it is simply a matter of physics and protein structure. When you beat egg whites, you are physically stretching the proteins and trapping air bubbles inside them. The addition of sugar stabilizes these bubbles, creating a structure that can withstand the heat of the oven.
To achieve the “ethereal texture” we desire, there are several non-negotiable rules:
-
Cleanliness: Your bowl and whisk must be completely free of any fat or grease. Even a tiny speck of egg yolk will prevent the whites from foaming.
-
Temperature: Room-temperature egg whites expand much more easily than cold ones, resulting in a loftier meringue.
-
Cream of Tartar: This acidic ingredient acts as a stabilizer. It helps the egg proteins bond together more tightly, preventing the meringue from “weeping” or collapsing.
You begin by beating the whites until foamy, then gradually adding the sugar and cream of tartar. You are looking for “stiff peaks”—this is the stage where you lift the whisk and the meringue stands straight up like a mountain peak without drooping.
Assembly: The Marriage of Layers
Once your filling has cooled slightly and your meringue is whipped to a glossy sheen, the assembly begins. Spreading the meringue over the pie is where you get to express your inner artist. It is not just about aesthetics; it is about function. You must spread the meringue so that it completely covers the filling and touches the very edges of the crust. This “anchors” the meringue, preventing it from shrinking away from the sides during baking.
Using the back of a spoon, you can create the peaks and valleys that will catch the heat and turn a beautiful golden brown. These peaks provide a delightful crunch that contrasts with the soft, marshmallow-like interior of the meringue.
The Final Transformation: Baking to Perfection
The pie returns to the oven at 350°F (175°C) for approximately 15 minutes. This isn’t about cooking the filling—that’s already done. This step is about “cooking” the meringue and giving it its visual allure. The dry heat of the oven browns the sugar in the meringue (a process known as the Maillard reaction), resulting in that captivating toasted-marshmallow flavor.
When you pull the pie from the oven, it is a sight to behold. The vibrant orange filling is visible beneath a crown of golden-tipped clouds. However, the most difficult part of the recipe follows: the wait. The pie must cool completely to allow the filling to set fully. If you cut into it too early, the filling may run. But once set, the result is a clean, multi-layered slice that is as pleasing to the eyes as it is to the palate.
| Component | Role | Key Tip |
| Crust | Structural Base | Par-bake (blind bake) to avoid sogginess. |
| Orange Curd | Flavor Core | Whisk constantly to prevent lumps or scorching. |
| Egg Yolks | Richness/Color | Ensure no white remains to keep the curd smooth. |
| Meringue | Textural Contrast | Anchor to the crust edges to prevent shrinkage. |
| Cream of Tartar | Stabilizer | Don’t skip; it prevents the meringue from collapsing. |
Frequently Asked Questions
Why is my meringue “weeping” or leaking water?
This is usually caused by the sugar not being fully dissolved or the meringue being overbaked. Adding the sugar very gradually while beating the egg whites helps ensure it dissolves. Also, spreading the meringue over a still-warm (but not boiling) filling can help “cook” the bottom of the meringue, creating a better bond.
Can I use bottled orange juice?
While fresh-squeezed juice is always superior for its aromatic qualities, a high-quality, not-from-concentrate bottled juice can be used in a pinch. If you do use bottled juice, be sure to add the fresh orange zest, as that is where the most potent flavor lives.
How do I get clean slices?
For the best results, use a sharp knife dipped in hot water and wiped dry between every single cut. This prevents the sticky meringue from clinging to the blade and tearing the layers.
How long does Orange Meringue Pie last?
Like all meringue pies, this is best enjoyed on the day it is made. Over time, the meringue can become tough or start to release moisture. If you must store it, keep it in a cool, dry place rather than the refrigerator if possible, as humidity is the enemy of meringue.
A Celebration of Flavor and Artistry
The Orange Meringue Pie is more than just a dessert; it is a celebration of the season’s best citrus and the timeless techniques of pastry arts. It embodies a harmony of flavors—the tartness of the orange, the richness of the butter, and the sweet fluffiness of the meringue. It is a dish that invites you to slow down, to savor the process of whisking, whipping, and decorating.
When you present this pie to your guests, you aren’t just giving them a treat; you are sharing a labor of love. The visual contrast of the bright orange hue against the white and gold meringue is enough to make any occasion feel like a celebration. So, gather your oranges, preheat your oven, and embark on this culinary journey. Your taste buds—and your guests—will undoubtedly thank you for the blissful results of this irresistible citrus symphony. Enjoy every heavenly bite!
Full recipe:
Ingredients:
– 1 (9 inch) unbaked pie crust
– 3/4 cup sugar
– 1/3 cup cornstarch
– Pinch of salt
– 1 cup orange juice
– 1/2 cup lemon juice
– 1/4 cup water
– 4 eggs, separated
– 4 tablespoons butter or margarine, cut into pieces
– 2 teaspoons grated orange zest
– 1/2 cup diced orange segments
– 1/2 cup white sugar
– 1/4 teaspoon cream of tartar
Directions:
1. **Preheat & Prep:** Begin by preheating your oven to 400 degrees F (205 degrees C). Line the pie crust with aluminum foil and add pie weights or dried beans. Bake until the crust’s edge turns golden, approximately 10 minutes. Remove the foil and weights, then bake for an additional 5 minutes.
2. **Create Filling:** In a small saucepan, combine 3/4 cup sugar, 1/3 cup cornstarch, and a pinch of salt. Mix in orange juice, lemon juice, and water. Whisk in the egg yolks. Cook over medium heat, stirring frequently, until the mixture thickens and becomes bubbly (about 5 minutes). Remove from heat, and stir in butter and orange zest. Optionally, add diced orange segments. Pour this luscious mixture into the prepared pie crust, cover with plastic wrap, and set aside to cool.
3. **Prepare Meringue:** Once the pie filling has cooled to room temperature, preheat the oven to 350 degrees F (175 degrees C). In a large glass or metal bowl, beat the egg whites until foamy. Gradually add 1/2 cup sugar and cream of tartar, continuing to beat until stiff peaks form. The meringue should hold a sharp peak that retains its shape.
4. **Meringue Topping:** Spread the meringue over the pie, ensuring it completely covers the filling and meets the edges of the pie crust.
5. **Bake to Perfection:** Place the pie in the preheated oven and bake until the meringue topping achieves a golden brown hue, approximately 15 minutes.
Indulge in the vibrant flavors and textures of this Orange Meringue Pie, a harmonious blend of citrusy sweetness and cloud-like meringue perfection. A visual and gustatory delight for any occasion.